How Does Shopify Work? From Setup to First Sale


Shopify solved a really valuable problem: how do you enable anyone to sell online without making them learn web development?
The answer was bringing together a digital storefront, inventory management, and payment processing into a single platform. Shopify has evolved since it launched in 2006, but it is still one of the most popular options for people looking to get into ecommerce.
This post explains how Shopify works, and walks you through the setup, sales process, and pricing. You will understand exactly what you are paying for before you commit.
Shopify Overview: What It Is and How It Works
Shopify is a beginner-friendly ecommerce platform that’s helped millions of new brands and established businesses sell to customers.
As a hosted, cloud-based platform, Shopify runs on its own servers. You do not have to download any software, write any code, or stress about security.
Once you create a Shopify account and choose a subscription plan, you simply log in to manage your store.
Think of the Shopify platform as a way to rent a fully-functional online store that has everything you need to start selling. Here’s a simple diagram that maps out how Shopify works:
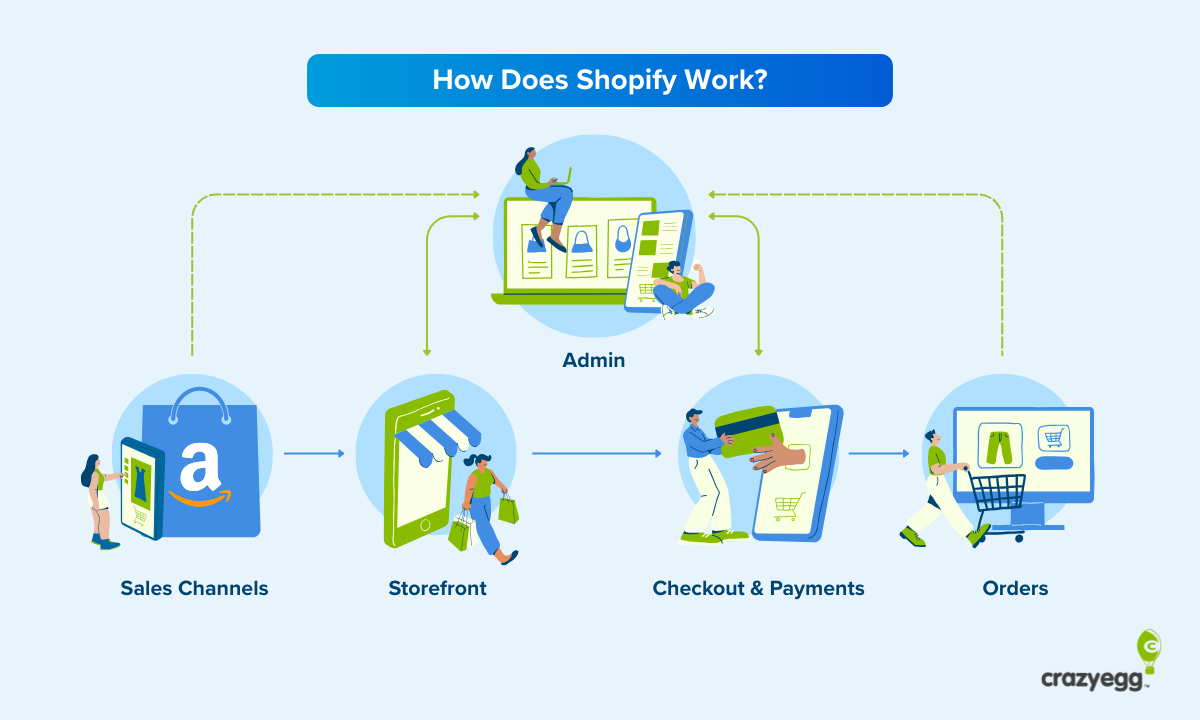
The Shopify platform includes the Admin portal, your digital storefront, and checkout experience. These are all hosted by Shopify.
From your Admin account, you can oversee your store’s presence on different sales channels (like search engines, social media, and marketplaces), as well as manage your orders with different shippers and suppliers.
Because your Shopify account is integrated with third-party channels and order fulfillment solutions, you can maintain oversight of the entire buyer journey: finding your products on Instagram, browsing your store, paying with a credit card, and shipping their order.
What’s included in the Shopify platform
Let’s take a closer look at the key components of a Shopify account:
- Admin: Oversee your storefront, inventory, orders, and sales channels.
- Storefront: Build your store with a drag-and-drop editor
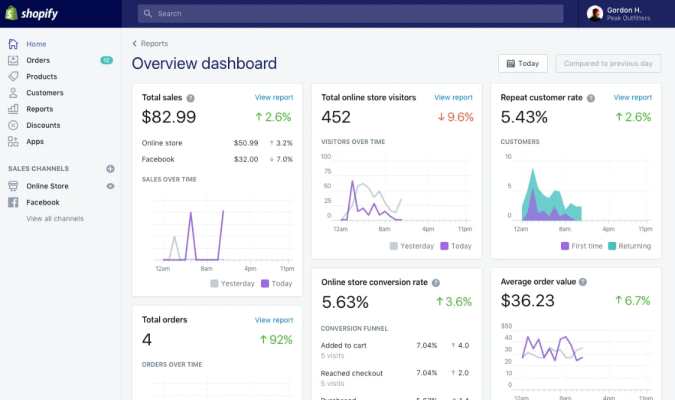
- Analytics: Monitor sales, store traffic, conversion rates, and refunds rates
- Inventory: Add products, organize them in collections, and track stock counts
- Orders: Track orders, shipping, cancellations, returns, and refunds
- Payments: Manage online payment gateways and in-person point of sale devices
- Customers: Store customer profiles, order history, and track lifetime value
- Sales channels: Sell on social media, marketplaces, and in physical locations.
- Marketing: Create discount codes, email campaigns, and abandoned cart reminders
- Apps: Extend your store’s capabilities with thousands of third-party tools.
Another key benefit of Shopify is that all of the website security and maintenance is handled by the platform. You won’t have to worry about installing updates or security patches to make sure your store is fully functional, and providing a smooth, safe experience for customers.
Building your own store from scratch would involve hiring and connecting all those services in order to start displaying products, taking customer credit info, and shipping orders.
This is a huge part of Shopify’s appeal and why they have millions of merchants in 175 countries. You don’t need any technical knowledge to launch and grow an ecommerce business.
What’s integrated with the Shopify platform
In addition to the built-in features of the Shopify platform, it comes with pre-built integrations with:
- Social media platforms, like Facebook, Instagram, TikTok, and Pinterest
- Search engines, like Google and Bing
- Marketplaces, like Ebay, Amazon, Target Plus, and Etsy
- AI Tools, like ChatGPT, Claude, and Google Gemini
- Suppliers, like Spocket, AliExpress, Faire, and Handshake
- Major carriers, like USPS, UPS, DHL, and FedEx
- Third-party logistics (3PL), like ShipBob, Flexport, and Amazon FBA
Some of these integrations are supported by built-in features in the Shopify platform. Others require additional tools from the Shopify App Store, which has more than 8,000 apps.
This rich ecosystem of apps and integrations is another reason for Shopify’s popularity. Most other ecommerce platforms have a much more limited set of options to extend and customize what you sell and how you sell it.
What Can I Sell on Shopify and How Does It Work?
Shopify supports several different business models, which are outlined in the table below:
Businesses use one or more of these models based on the type of products they sell, their maturity, and their goals.
Shopify does not force you into a single model, so you can mix and match as you go.
For example, some brands will start with dropshipping or print on-demand because these models have a relatively low cost of capital to get started. Over time, they may transition away from pure dropshipping and start to purchase, hold, and ship their own inventory.
Getting started with Shopify
In this section, we’ll cover creating an account, starting a free trial, your subscription plan options, what’s included, and some of the extra fees that might not be obvious to new users.
Creating an account
This is really straightforward. It takes about 10 minutes and you don’t need a credit card to start.
- Visit the Shopify website and click “Start free trial”
- Enter your email address
- Create a strong password
- Answer a few questions about your business (optional)
- Choose a store name
That’s it. Now you have access to the admin dashboard for your Shopify store, which is automatically created on a Shopify subdomain (example-store-name.myshopify.com)
Keep a record of your myshopify.com domain name, even if you plan to connect or add a custom domain. It’s how you will identify your account when you talk to Shopify support, and you will continue to use this URL to log in to your Shopify account, even if your customers visit a different domain to shop.
Shopify plans and pricing
The next step is to select an appropriate Shopify plan that fits with your goals and budget.
You don’t have to do this right away, but you won’t be able to start selling until you select a plan, so it’s a good idea to start familiarizing yourself with the various options. That way, you can use your free trial to explore the features and decide what you really need.
You can upgrade or downgrade plans at any time.
Generally speaking, upgrading is easy, you’ll have access to more features and higher plan limits. Downgrading is a little trickier, as you may lose access to various features. So don’t feel bad about starting small and building up.
Below is the pricing information, but please bear in mind that prices do change, so please visit Shopify to double check the current pricing.
Basic, Grow, Advanced, and Plus all include the full online store that Shopify is known for, though Plus is really geared toward enterprise businesses with $1M+ in revenue.
The Starter plan is a pared down version of Shopify that allows people to sell a few products directly through social media using links to a secure checkout instead of a full website. It’s good for creators, influencers, and beginners with low-volume sales who want an easy way to try their hand at ecommerce.
The Retail plan is aimed at businesses with a physical location that want to manage in-person sales. It offers less of the online selling features, but comes with support for POS hardware, inventory syncing, and staff management.
I don’t want to get into the specific features included with every plan, because it may change between now and when I come back to update this post. You can find excellent, up-to-date details for all plans on Shopify’s site.
What I would like to call out is that all of the core Shopify plans (Basic, Grow, Advanced, and Plus) include:
- Drag-and-drop online store builder
- Analytics
- Unlimited hosting (i.e. no extra charge for more traffic)
- Unlimited products
- Unlimited contacts
- Email marketing
- Discount codes
- Gift cards
- Fraud analysis
- Sales tax calculation
- SSL certificates
- Shipping labels
- 24/7 support
This is a strong feature set and includes many capabilities that other ecommerce platforms charge extra for, or only include with premium plans.
What costs extra?
- Custom domains: $12-$20/per year, though you can use a domain you already own for free.
- Premium themes: $150-$400 one-time cost, though free themes work fine
- App subscription fees: Variable cost, which you may or may not need
- Credit card processing fees: Vary by plan, but these are unavoidable on any ecommerce platform.
- Transaction fees: Vary by plan, though they are $0 when you use Shopify Payments
Depending on your business model, where you are based, and where your customers are located, there may or may not be additional fees to contend with.
There are definitely ways to keep costs down, just bear in mind that many stores end up using premium themes and apps to create the customer experience they want.
You will have to select a plan in order to make your store public and begin taking orders, you are free to explore the Shopify platform and work on the backend of your store during the free trial, which is the best way to figure out what you actually need.
How payments work on Shopify
Whenever someone makes a purchase from your store, the credit card companies take a cut. This is going to happen whether you use Etsy, WooCommerce, or swipe a card at your brick-and-mortar store.
The amount Shopify charges for credit card processing fees is based on the plan you selected, and whether the sale happens online or in-store:
For example, if you have the Basic plan and sell a $40 item in your online store, you will pay $1.46 in fees.
If you are using Shopify Payments, the built-in payment gateway, there is no additional transaction fee on top of the credit card processing fee. (Unless you are using a Starter plan, which has a 5% transaction fee on top of the credit card processing fee, even with Shopify Payments.)
What if I don’t want to use Shopify Payments?
That’s fine. Shopify supports PayPal, Stripe, and other payment gateways.
But there is an additional transaction fee when you use another payment gateway besides Shopify Payments. The amount depends on your plan:
- Basic and Retail: 2%
- Grow: 1%
- Advanced: 0.6%
- Plus: Custom
For example, if you were to sell a $40 item using Stripe as your payment gateway, you’d have to pay Stripe AND pay the Shopify transaction fee. It would look like:
- Stripe’s credit card processing fee: 2.9% + 30¢ per transaction = $1.46
- Shopify transaction fee (with Basic plan): 2% = $0.80
- Total fees: $2.26
You can see how the extra fees would add up quickly, eating into your net revenue for every sale. Adding additional payment options is a classic trick for increasing conversion rates, but you should make sure that the math pencils out.
Setting Up Your Shopify Store
Once you have created a Shopify account, the platform spins up a store for you immediately.
Let’s walk through the basic steps you need to make it your own.
Configure store settings
Once you are in Shopify admin, you will need to add some information about your business. You don’t need to add all of these details right away, but plan on adding them as soon as you can.
- Store name
- Full legal name
- Business address
- Store time zone
- Default store currency
- Default store weight unit
You can add/change these items from Shopify admin by going to Settings > General. For more guidance, view the Shopify Help guidance for setting up business settings.
Bear in mind that your contact information must be current, accurate, and published in an accessible public location in order to satisfy Shopify’s Terms of Service and consumer protection laws.
Create store policies
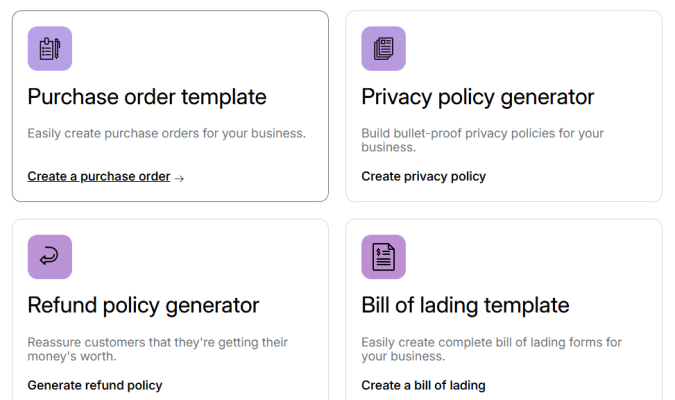
To comply with Shopify’s Terms of Service and consumer protection regulations, there are several policies you need to have published publicly on your site. These include:
- Terms of Service policy
- Privacy policy
- Refund policy
- Shipping policy
Shopify offers free tools to generate these policies, which protect both you and your customers.
The specific policies you need in place depend on the country you store is located in and the countries you ship to. For example, if you are based in or ship to customers in the European Union, you will need to display your VAT number. See this post from Shopify about setting up EU taxes.
If you are unsure about regulations or taxes in your country or the countries you sell to, consider talking with a lawyer to make sure your store is in compliance.
Design your store
The way your store looks is determined by your theme. A default theme is set up when you first launch your store. The default theme is fine for getting started.
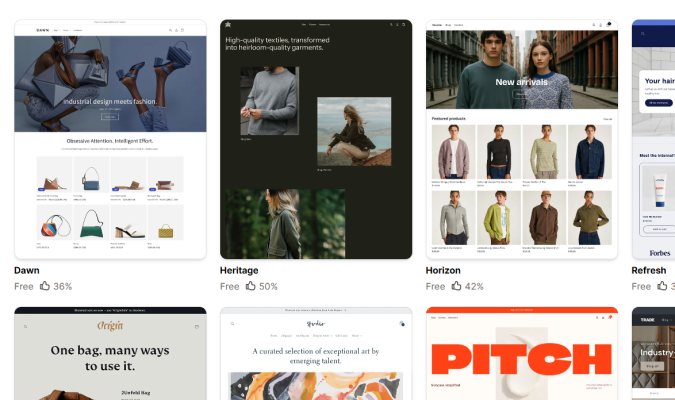
If you want to change how your store looks, you will need to add more themes to the Theme Library in your admin. Here are your options:
- Use a free theme: These are made and maintained by Shopify and are truly free.
- Use a paid theme: These are created by vetted third-party developers and designers. You can test out and customize the theme for free, but you have to buy the theme in order to publish your site with it.
- Use Shopify AI: If you are using a free trial, Basic, Grow, or Advanced plan, and your site is set to English, you can generate a free, personalized theme using a short prompt.
- Use your own theme: You can upload a ZIP file, push it to your store using Shopify CLI, or use the GitHub integration if it is hosted there.
To add a theme, you can browse your options in the Shopify Theme Store, or go to Online Store > Themes in your Shopify admin.
Once you add the theme, it will be available in your Theme Library, and you can start
Once you select the theme, customizing it is all point and click using the Theme editor.
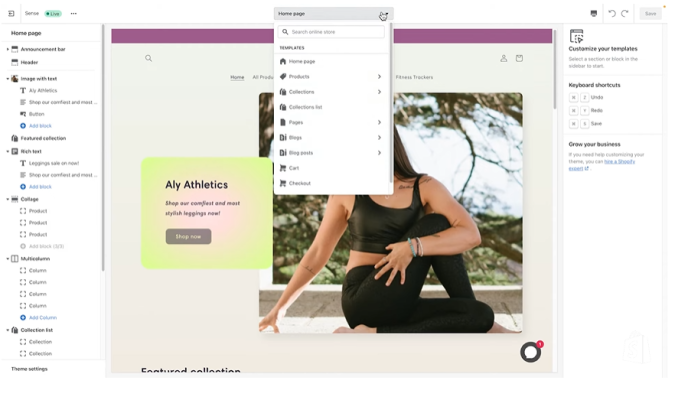
You will be able to adjust the layout, edit text, add different elements, and create templates for specific types of pages. In the Theme settings section, you can adjust the overall settings for your store, such as the color palette, logo, and text.
At any point, you can preview what the theme will look like to users.
All of the popular themes are optimized for mobile users, meaning that the theme will display well for people shopping on their phone or tablet. As you adjust various typographical elements, keep users with small screens in mind. Small buttons and text will cause problems.
I recommend duplicating the theme first to create a backup. That way, you can always go back and start fresh if you don’t like what you did.
Once you are happy with how your theme looks, click the Save button. Find the theme in your Theme Library and select Publish.
Add your products
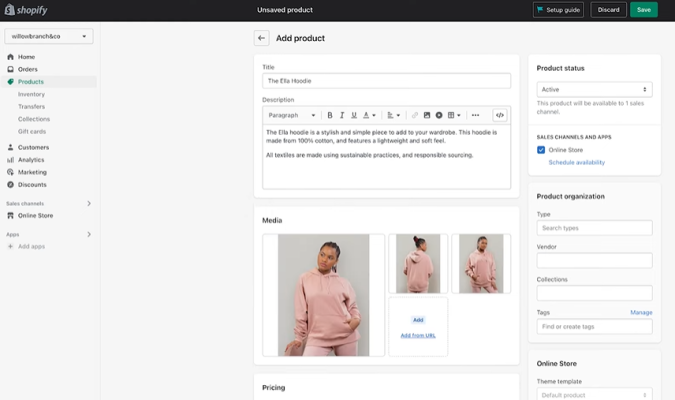
On the Products page, you can add new products, update product information, and organize products into collections.
When you add a new product, it will open a window where you can enter information, such as the title, description, price, SKU, and other details. You can also add media, such as images, 3D models, or videos.
If necessary, you can add options for products (like Small, Medium, and Large), setting unique prices and stock counts for different variants.
For physical products, you must add a weight and any customs information, if applicable. You can also adjust stock counts to track inventory, and mark whether or not you want this product to be shown when it is out of stock.
There are many more options, which you may or may not need, depending on the types of products you carry and how many locations you have inventory.
Once you are happy with the product, switch its status to active. Then select the sales channels and apps where you want this product to appear, such as your online store, Google, Instagram, etc. You can leave the status as draft if you are not ready for it to appear.
Set up payments method
You can manage your payment methods on the Payments page in your Shopify Admin.
The easiest and least expensive method to use is Shopify Payments, the built-in payment gateway. To use Shopify Payments:
- It must be available in your country.
- Your account must have two-factor authentication setup
- You have to select your store’s currency
If you do not have a payment gateway set up, go to Settings > Payments and select Activate Shopify Payments. If you have a payment gateway set up already, select Switch to Shopify Payments.
Fill in the required information to start the verification process. Once you are verified, you will be able to connect your bank account to receive payments.
Depending on your bank or your business location, you may be asked to provide additional information.
You can also set up methods for customers to pay without a credit card, such as using PayPal, Apple Pay, or by using cryptocurrency. Bear in mind that there will be an additional transaction fee from Shopify on top of whatever the other payment provider charges. Using Shopify Payments does not have a transaction fee.
Configure shipping and fulfillment options
In the Shipping and delivery section of your dashboard, you will want to configure shipping rates, delivery methods, processing times, and/or set up fulfillment services to handle all of this for you.
There are a ton of different options, and you need to think long and hard about what the best process is going to be for you and your customers. They want things fast and cheap. You want to be competitive, but still make a profit.
The best setup is going to depend on your products, your inventory locations, where your customers are based, and other factors.
Shopify provides guidance about how to set up shipping and fulfillment, but I would do some research and get specific guidance from other ecommerce merchants who sell a similar range of products as you. Many of these merchants are on YouTube and forums, passing on their knowledge for free.
The more you can learn about how to be efficient with package sizes, shipping profiles, order routing, the better. You can keep costs down on your end, and increase speed and predictability for your customers.
Connect or add a domain
If you did not change your myshopify.com domain when you signed up, you can do so by going to Settings > Domains. Note that you can only change your domain once after it is set up.
If you already have a domain, you can connect it to Shopify, or transfer it from your domain registrar to Shopify. If not, you can buy a custom domain (www.your-store.com) and set that as the primary domain, which is what customers will see.
A custom domain, whether it’s your existing one or a purchased one, looks more professional than running your site on another brand’s domain. It also provides real SEO benefits because you will be able to build your domain authority over time. If you switch your domain later, you will basically be starting fresh at that point, in the eyes of Google, Bing, and other search engines.
This isn’t something you have to do right away, but the long-term benefits of building your store on your own domain are real, and something you will want to do if your store takes off.
Confirm everything works correctly
Before you publish your store, go through and make sure that everything is set up correctly.
Here are a few things you can do to find any issues and avoid trouble:
- Place a test order. This will ensure that everything in your checkout process works as it should. You’ll get to see that the order is processed, inventory is adjusted, and email notifications are all sent properly. See this post from Shopify about placing a test order.
- Simulate a transaction to test that your payment gateway is set up properly without incurring any charges from the provider.
- Preview your store on desktop and mobile. Do one final visit and click around to make sure that everything looks the way it should. Some things to check are that images display well, text is readable, and that CTA buttons are easy to tap. You should also verify that all of the links work and go to the right place.
- Backup your store. This is just a standard best practice for publishing anything online.
You should be good to go. If you have any lingering doubts, don’t hesitate to reach out to Shopify support or to consult an expert in your jurisdiction.
Publish your store
If you are happy with how your store looks and all of the parts are functioning correctly, you can officially open your store to the public.
In order to do this you need to have selected a plan. So if you are still within the free trial period, you will need to commit to a plan. Typically, Shopify runs promotions, so you can get the first few months at a discounted rate versus having to sign up for an annual plan right away.
Once you have selected a plan, go to Online Store > Preferences in the Shopify admin. Go to the Store access and click Password protection to disable it. Click save.
Now that your store is no longer password protected, it is available to the public.
Congratulations. You are ready to sell.
Tips for building momentum before you launch
Instead of opening your store and praying that people show up, you can take an active role in making sure there is a line of people waiting to get in and shop.
Here are some things you can do while you are getting the backend of your Shopify store set up to start creating engagement and interest:
- Set up a “Coming Soon” style landing page where you collect emails by offering subscribers early access, exclusive deals, or limited-time launch week discounts. A simple opt-in popup is perfect for building your subscriber list so you can start generating traffic to your store with email campaigns.
- Run teaser campaigns. Use social media as a place to build excitement about your product. A “behind the scenes” reel on Instagram or some or a clever collaboration with an influencer who shares your audience can create anticipation around your launch and help you gain followers on Instagram.
- Set up preorders in Shopify by using an app like PreProduct or Essent Preorder Back in Stock. Some of them offer free versions. This lets you validate demand, get some early customer data, and start generating cashflow. Keep in mind that you have to have an active Shopify subscription to take sales.
- Participate in communities and forums. There are specific groups on Reddit, Quora, and Facebook that are probably interested in what your store is selling. Find a few of these niches that overlap with your target audience. Start interacting there ahead of your launch to build trust and establish yourself (or your brand) as an active member of the community. These places have been spammed to death, so if you are marketing on Quora or another community, be sure to add value to the discussion, not just promote your brand shamelessly.
- Make sure your site is SEO-optimized. You don’t have to go overboard or hire someone, but doing the basics like adding alt-text to images, creating FAQ pages, and writing good product descriptions is a good idea. There are also plenty of tools on the Shopify App store that can help you improve SEO, which will be crucial if getting more organic search traffic is a key part of your marketing strategy.
How Sales Work on Shopify: Orders and Fulfillment
When a customer completes a purchase in your store, the order appears in the Orders section of your Shopify dashboard.
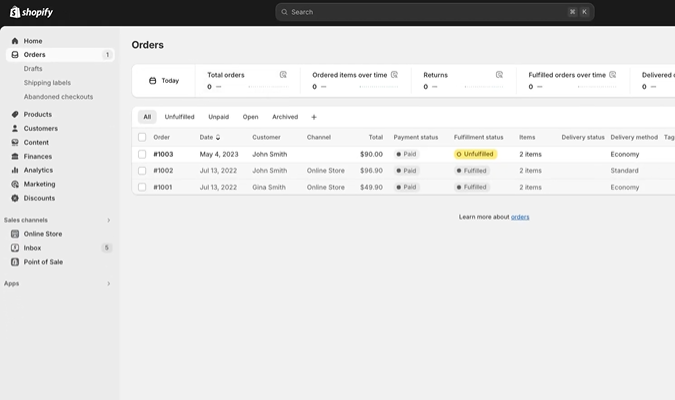
You’ll also get a notification via email or SMS. The order will be marked as Unfulfilled, and it’s going to have all the details you need to know: what they bought, how much, where it’s going, how they paid, along with any special instructions they shared at checkout.
Shopify will automatically add a customer profile to your Customers list if the order is from a new customer, and it will automatically add the order to an existing customer profile.
It’s a good idea to check the shipping address to make sure it’s valid. If the shipping address is likely incorrect, Shopify will flag it, and make suggestions for how to fix it. It’s not a 100% perfect safeguard, but it will help minimize incorrectly sent orders.
Clicking on an individual order, you can view all the details, print packing slips, and view the timeline, which shows when they placed the order and where it is in the fulfillment process.
How the order is fulfilled depends on how you configured your shipping and deliveries. So if you manage your own inventory, you are going to have to pick and package the item, print a shipping label, and send it yourself. Then you can mark the order as fulfilled.
If you use a third-party fulfillment service or the Shopify Fulfillment Network (available in the app store), then they will handle the picking, labelling, and shipping once you accept the order.
You can track the order as it moves from your warehouse to your customer’s address in the timeline. Customers will be able to track the status as well, using a tracking number from the carrier to follow the package in real time.
When do you get paid for a Shopify order?
It depends on the payment method used for the order. With Shopify Payments, you can choose a daily, weekly, or monthly payout schedule. It typically takes 1-3 business days for payments to hit your bank account.
For your first order and payment, it will be a little slower. New Shopify Payments accounts have a waiting period, sometimes as long as 21 days, before the payment hits your bank account. But after that first payment, payouts are processed on the normal schedule.
If you are not in the United States, the payout schedule and regulations may be different.
Who Does Shopify Work Well For?
Now that you understand how Shopify works, you should have a pretty good idea of whether or not it is right for your business.
The beauty of Shopify is speed and convenience, but you sacrifice a bit of flexibility in terms of how you want to build your online store.
For individuals, new brands, and small businesses, Shopify makes sense to use if:
- You want to get started quickly, selling in days vs. weeks or months
- You don’t want to write code yourself or pay someone to do it
- You plan on growing your store a lot, as opposed to only ever selling a few products
- You want to be able to sell on multiple channels, like social media or marketplaces
- You aren’t worried about creating a unique looking store or shopping experience
- You are comfortable spending $40-$300 per month, or more if your store takes off
The people who have the best experience starting out with Shopify tend to fit that profile. These aren’t hard fast rules by any means.
So if you think this profile describes your goals, then head over to Shopify and get started for free.
There are other ecommerce platforms with different advantages and tradeoffs that make them strong contenders for individuals with different profiles.
For example, if you already have a WordPress site, are comfortable coding, and plan on organic search being a huge part of your traffic, WooCommerce is going to be very attractive.
Or, if you only plan on having a small product catalog and really care about how your online store looks, then Squarespace might be a better option.
Check out this roundup of the best ecommerce platforms, which can help you figure out if Shopify is truly your best option to get started.

